STAGE WRITE USER MANUAL
ACCOUNT
SUBSCRIPTION
On a computer, go to web.stagewriteapp.com to create an account with a username (email address) and password. Select the desired subscription in your account settings:
Pro Subscription: Full functionality for an unlimited number of productions.
Single Production: Full functionality on one production. If you already have several productions in your account, you can work with the first production created. The other productions will not disappear or be deleted but they cannot be opened or worked with until upgraded to an Unlimited subscription.
Trial: Free trial allows the user to test things out with full functionality for 30 days.
View Only: This system is designed for swings and understudies. You can view the entire production, receive up to date sync, but cannot edit any of the charts or script. Users do have ability to write personal notes on the charts that are only seen to them.
Enterprise: Your organization can manage the users on your team with a specified number of accounts, managed by the organization.
Corporate: Customized system for your organization.
Payment Info: Update or change credit card information. Payment is automatically charged either monthly or annually, depending on which subscription service you select. Payments are processed through Stripe.
Preferences: Choose to show or hide tips and video tutorials within the app.
Personal Information:
Name: Enter your First and Last Name. This name will be shown on your account and also to any collaborators who join your productions.
Email: This email is the email attached to your account and will be used for your login.
Password: This field allows you to change the login password for your account.
LOG IN
Go to stagewriteapp.com and log in by entering your username and password to log in to the web app or download the Stage Write iPad app and log in to your account inside the app.
IPAD
Download Stage Write from the App Store on your iPad. When you open the app, sign in with your Username (email) and password. If you already have Stage Write for iPad (our legacy app), you will need to add this new app in order to get the web features. Make sure to backup your productions from the Legacy app and then migrate your productions from the Legacy app to the new app.
Migrate from Legacy App: If you were a user of the original Stage Write legacy app, you can migrate your productions into the new app by tapping ‘Migrate from Stage Write’ on your iPad app (in the current Stage Write app), selecting the productions you want to migrate (we recommend you migrate all of your productions), then tap IMPORT. Once complete, close the dialogue box. After importing the productions you will need to manually sync them to appear in the web version by tapping the sync button next to the production.
PRODUCTION STATUS
Production Details: Productions connected to your account are listed in alphabetical order on the production home screen.
Type of Production: You can see if your production charts are connected to either a script or staging score.
Owner Status: This will show you if you are the owner or a collaborator on a production.
Sync Status: Here you can see if the project is in sync and the date when it was last synced to the system.
Favorite: You can choose to FAVORITE a production to keep at the top of your production list for easy access by tapping ‘EDIT’ at the top of the screen, select/unselect the productions, then tap ‘DONE’.
ADD PRODUCTION:
Add Production: + > Name > Choose Production Type > Add
To create a new production, simply hit the '+' button at the top of the Production list on the production home screen:
1. Enter the name of the production.
2. Choose if you want the charts to be connected to either:
A script: You will import a PDF of the script (or PDF of the musical score).
or
A Staging Score: You will create a Staging Score for the production to thoroughly detail the blocking/choreography of the production.
3. Then select 'Add’. This will take you to Production Details menu for your new production.
Production Details: Here you can enter or edit the name of the production, list the names of the creators of the show, enter the production date, import the show logo, and choose your cover page style.
ADD LOGO:
Add Production Logo: Select Image > Choose Image from iPad or computer.
To import the production logo, simply hit 'select image' and then scroll through the images from your photo gallery. This logo will appear at the bottom of each chart in your production.
STAGE DIMENSIONS
The stage dimensions you choose for your production will be the dimensions you choose to show on each chart. You might choose not to show the entire backstage space so you can focus on the stage pictures and only a little bit of the backstage space. The larger the space, the smaller each item will show on the screen, so it’s useful to show only the space that you intend to use for the production on your charts.
ENTER THE STAGE DIMENSIONS: Settings > Stage Dimensions:
WIDTH OF STAGE:
Usually, this would be the width of the proscenium opening – whatever is seen by the audience as ‘onstage’. It is this dimension where the staging number line will appear. In this example (40 ft.) the number line will go out to 20 on each side.

DEPTH OF STAGE:
Enter the measurement from the front edge of the stage to the depth you wish to show on each chart. In this example, even though the entire depth is 35 feet, the user has selected to show only 28 feet. The upstage scrim lies at that point and therefore no actors or scenery will be placed there:

OFFSTAGE WIDTH:
Enter the amount of offstage space you wish to show on each side of the stage. It’s useful to show at least SOME of the offstage space so you can show where the performers or scenery is holding prior to coming onstage. The number you choose here (5 ft. shown here) will be shown on both sides of the stage.
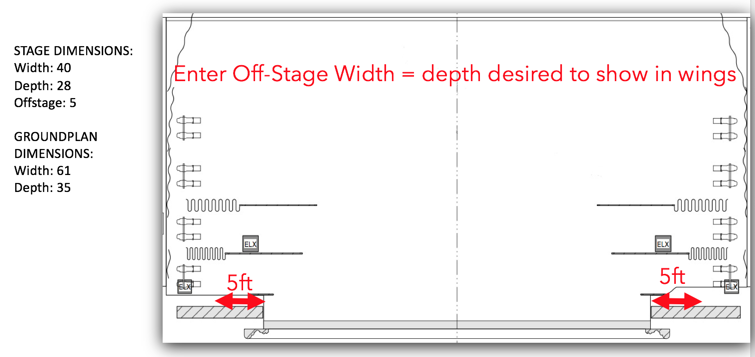
This creates the dimensions for your production. In this example, the user is not using the entire stage for the charts as shown here (blue area has been ‘masked out’):

IMPORT GROUNDPLAN:
IMPORT GROUND PLANS: Settings > Stage Dimensions > Edit Permanent Stage >
You can upload any jpeg file into the application for use in your production.
SAVE THE IMAGE TO YOUR COMPUTER or IPAD:
First, if it’s a PDF file, you should save that image as a JPG file and be sure to crop the image to the area that you want to include on the app.

Then, save it to your iPad or computer. If you have emailed the file to yourself and open it on your iPad, you can easily save the image to your Photo Gallery by a ‘long-hold’ on the image itself in the email. Select ‘Save Image’.
Once you have the JPG file in your photo gallery on your device, you want to IMPORT that file into your production:
Settings >Stage Dimensions > Edit Permanent Stage > Import Set Design
Here you can ‘Select Image’ from iTunes Share or Photo Gallery. Select the image you want to import. Give the image a name and a dimension. This will be the dimension of the entire image, including any white space on the image. Note: it may be different from the dimensions you chose for the production and hit SAVE.
DID YOU KNOW? The easiest way to import your ground plan is to use the ‘measure from image’ tool. All you have to know is the dimension of one thing. After importing your ground plan, tap ‘Measure from Image’ then with you mouse click and drag across the dimension of a known dimension. Enter that dimension in the ‘Reference Measurement’ box and tap ‘Use These Values’. This will calculate the dimensions of the entire image.
EDIT PERMANENT LAYER:
Edit Permanent Layer: Settings > Stage Dimensions > Edit Permanent Stage
Once you have set the dimensions of your stage, you can now draw any permanent elements of your stage. Using the shapes, set pieces, and drawing tools, you can draw any structural elements that never move during your production - and will show up on every chart. For example, you can draw the proscenium arch, wings, and any other permanent elements that you want displayed on every chart in your production.
TIP: Keep in mind that whatever you ‘select’ will come to the top of the stack of items added while you edit. If you have imported a ground plan and are adding something small on top of that layer, make sure to select the item you want to adjust. It’s easy to select the giant ground plan by mistake, which will come to the top. By doing that, it may appear that you have lost the smaller items you were working on. It’s not gone, but it’s hiding under the ground plan. If you tap ‘CLEAR’ on the edit bay this will de-select everything and you can see everything in the layer it will appear on the charts.
CUSTOM NUMBER LINE:
Custom Number Line: Settings > Stage Dimensions > Edit Custom Number Line
You can customize the Number Line to appear the way you want it to appear. The default setting is a Center Mark and then a mark every foot, but you can add markings at any distance you prefer and you can even decide to remove the center mark, if you wish. List the measurement you prefer between each mark and turn on or off the center mark and the custom number line will be previewed. If you save the settings the custom number line will appear on every chart.

SET PIECES:
SET PIECES: Settings > Set Pieces
You can import or create any set pieces, or props, that you will use in your production. You can also choose to import the drawings from the designer if you prefer. These pieces will hold in the 'wings' until you want them onstage.
Import Set Piece: Settings > Set Pieces > Import
You can easily import any design into the set piece list by selecting 'import', which will bring up the 'Import Set Piece' menu. Here you can select the image you want to import by tapping 'Select Image'. Then choose the image you want to import from 'ITunes Share' or 'Photo Gallery'. Then be sure to give the image a name and enter the dimensions of the piece. That way the imported image will remain the same on every page. Once you have selected the image, named it and entered the dimensions, tap 'Save' to add it to the saved list of set pieces.
Create New Set Piece: Settings > Set Pieces > Create
To draw a new set piece, hit the 'CREATE' button. This will bring up the 'set piece lab' in which you can draw your set piece. Enter the name of the piece (i.e. bedroom unit), and the dimensions for the set piece.
You can draw shapes and add text by hitting the ‘shape/text' button, which will allow you to draw squares, rectangles, circles, ovals, triangles, arcs, lines, arrows, curtains, and customized lines and curved lines and arrows, or freehand drawing. Choose the item you want to add to the set piece, it will appear in the lab and you can re-size the item by dragging the upper right corner of the object. Then you can move the object into the correct position and the correct scale.
TIP: Make sure your set piece is placed in the bottom left corner (0 x 0) of the lab. When you assign a dimension to the object the system will crop at the dimension you identify. Any items outside of the cropped area will not appear on the set piece. For example, if you create something with a 10 x 10 dimension, make sure everything you need is placed within the 0 x 0 and 10 x 10 area.
You can also use some of the pre-set set pieces in the StageWrite catalogue of chairs, benches, couches, stairs, instruments, tables, or use pieces that you have previously imported.
TIP: Once the set piece has been placed onto a chart, the dimensions cannot be changed. If you wish to change the dimensions, you can simply delete it from the charts and re-edit the piece.
PERFORMER ICONS:
Import Actor Icon: Settings > Performer > Import
You can import a JPG file as a performer icon. Press ‘import’ and select the JPG file you want to upload as the image for the performer. The dimension of the image will be saved as 2’ x 2’ so make sure your image is already cropped as a square so no distortion occurs.
Create Performer Icon: Settings > Performer > Add
Easily create unique performer icons by tapping the 'add’ button, which will bring up the 'New Actor' menu. On this menu, you can enter the Actor Name.
Enter the text you want to appear inside the icon. Note: It's useful to keep this text short or abbreviated so that you will be able to read the text when you enter the information on the chart.
Performer Name:This is the name the performer will be known as in the Staging Score. If you use an abbreviation in the actual icon, you can list the longer name here more easily.
Text for Icon:This is the text that appears within the icon shape.
Re-size the Text: Using the slider, easily adjust how you want the icon label to fill the shape.
Choose the Shape: Choose square, circle, or diamond shape for actor icons.
Choose Shape/Border/Text Color: Select color for shape, border, and text by using the color picker. Press SELECT once you are happy with the color.
Edit the Icon: Once you have entered the information, you can tap 'save' which will save the actor icon and add them to the 'green room' for when you need them on stage. If you decide you want to adjust the icon later, you can always change the icon. For example, if you ever replace an actor in the show, you can easily re-name the icon and the new icon will appear on every chart in the show.
Reorder/Edit Performer Icons:
By pressing the DELETE/RE-ORDER button you can re-order the icons by dragging the ‘handle’ and sliding the icon up or down in the list to change the order. By tapping on the ‘delete’ button to the left of the icon, you can choose to ‘delete’ the icon from the production. This will remove the performer from any existing charts.
SCENE LIST: Settings > Scenes
In order to create any charts, you must have at least ONE scene. By double tapping or by pressing the ‘add’ button, you can enter the name of the scene or number. The RETURN key will take you to the next line. You can also re-order or delete the scenes by pressing 'edit' button in the same way you re-order or delete performer icons.
COLLABORATING:
Add Collaborator: Settings > Collaborators > Add:
Adding collaborators to your production can be done on the web system, by adding the email address of the new collaborator. To add multiple collaborators, separate emails with comma. Choose whether to share the Entire Production or Selected Sections of the production for them to be able to edit:
Entire Production: If you choose the Entire Production, this will give the user full access to edit charts, script/score, settings of the production. The changes they make will be synced to the original production so it’s important that you only allow someone you trust to make edits to the production. You both can be working at the same time. In the case that you both make a change to the same chart, or same staff, or same page in the script, the most recently synced version will be kept. Make sure you sync frequently to avoid any conflicts.
Selected Sections: If you select only portions of the production, they will be able to edit only those scenes or sections you turn ON. They will be able to view all the charts/scenes, but can only edit the sections you turn on. You can change their settings at any time, including ending the collaboration.
Syncing Tips: In working with collaborators, it’s important to keep in mind that you are both editing the same document. If you are working in different scenes or different charts there should be no conflict. However, if you both make a change to the same chart, or same staff, or same script page, only the last synced version will be kept. If you are both working in the same scene, it’s important you communicate who is doing what so you don’t lose any information. When working on iPad, sync your work frequently so it will upload to the system. When working on the web, press SAVE frequently so those changes can be saved and sent to any shared devices. On the iPad, the sync icon will activate (turn red and pulse) when there are updates detected from the web version. Be sure to tap the sync button when it activates to sync the changes.
Editing Collaboration/Stop Collaborating: Settings > Collaborate
If you wish to stop collaborating with another user, tap on their email address to see their settings. You can change the scenes you give access to, or tap ‘Stop Collaborating’ to take the production out of their account completely. They will be notified and the production will disappear from their account, both on the web and the iPad.
COPY PRODUCTION:
COPY PRODUCTION: Settings > Copy Production
You can create a duplicate production by tapping Settings > Copy production.
Production Name: Give your new production a different name so you can distinguish it. For example, ‘Romeo and Juliet Broadway’ can become ‘Romeo and Juliet Tour.’
Production Type: Choose if you want it to be connected to the script or the Staging Score. Note: if you keep it the same type, the script or score will also copy over. If the existing production is a Script and you choose Score, you will need to create the score and vice versa.
Dimensions: You can choose the dimensions of the new production or keep the dimensions the same. If your new production is smaller than the original, any objects that were placed on the outer edges will be pushed in so you may need to decide what to do with offstage space.
New Ground Plan: The original ground plan will be copied over. If you need to change the ground plan for the new production, go to Settings > Stage Dimension > Edit Permanent Stage > Import new ground plan (using the same process as you did originally).
Rename Performers: Settings > Performer Icon:
You can easily rename the performer icons for a new production so the icons match the current cast. Tap on the existing icon and change the text within the icon and press ‘save’. This will change the icon across the entire production with the new names.
DELETE PRODUCTION:
If you wish to delete the entire production, to go Settings > and tap DELETE PRODUCTION. This cannot be undone or retrieved so make sure you really don’t want the production any more.
PRINTING/CREATING PDF:
You can print your production by creating a PDF of the production and printing the PDF by tapping the PRINT icon. Choose what aspects of the production you want to print:
Printing Charts/Script:
Production – Charts/Script: You can choose to print the entire production, both charts and script. The script will appear on the right side and the charts will be printed on the left side (back of the page) according to the sections of the script the charts have been linked. For example, if page 10 in the script has two charts linked to that page, those two charts will be printed on the left of the page.
Production – Charts: This will print the charts only for the entire production, one chart per page.
Production – Script: This will print the entire script for the production.
Current Scene – Charts: This will print all the charts in the currently selected scene, one per page.
Current Chart: This will print just the currently selected chart.
Printing Charts/Score:
Production – Charts & Score:This will print the entire production, both charts and script. The score will appear on the right side and any linked charts to that page will be printed on the left side (back of the page).
Production – Charts:This will print all the charts in the entire production, one chart per page.
Production – Score:this will print the entire score without any linked charts.
Current Scene – Charts & Score:This will print combined charts and score in the currently selected scene.
Current Scene – Charts:This will print all the charts in the currently selected scene.
Current Scene – Score:This will print the score from the currently selected scene.
Current Chart: Print the currently selected chart.
Current Score: Print the currently selected score.
Download PDF:
The system will notify you that the PDF has been created and will appear at the bottom of the print icon list. Tap on the download icon. The system will automatically open the PDF in the browser by default. It is recommended that you open the PDF in a PDF reader. Set your browser to open PDF in reader instead of browser.
IMPORT FONTS INTO WEB:
In order to ensure that the text on your production matches exactly with other devices, be sure to install the fonts into your browser by following the prompts on your homepage on the web. If you don’t do this, there will be small inconsistencies in the spacing of any text in the production as you compare with your device and will make a difference when you print.
CHARTS
CHART SETTINGS:
Number Line: On the front edge of the chart you can place a number line with a marker at the center line (0) and markings every foot to stage left and stage right. A custom number line can also be created in settings.
Grid Lines: You can select how you'd like your charts to appear by choosing to turn 'on' or 'off' the number line, the centerline, the Vertical grid lines, the horizontal grid lines.
Chart Numbering: You can also choose to have 'automatic' chart numbering (i.e. 1.1, 1.2, 1.3, 1.4, 2.1, 2.2, etc.) or 'manual' chart numbering if you prefer to have another numbering system of your choosing. NOTE: if you choose manual charts, you’ll need to ensure you list something in every chart, or the system will not be able to assign the chart to the production.
Chart Numbering: You can also choose to have 'automatic' chart numbering (i.e. 1.1, 1.2, 1.3, 1.4, 2.1, 2.2, etc.) or 'manual' chart numbering if you prefer to have another numbering system of your choosing. NOTE: if you choose manual charts, you’ll need to ensure you list something in every chart, or the system will not be able to assign the chart to the production.
Point of View: You can also choose to view the charts from the point of view of the audience/director or from the point of view of the performers.
Performer Placement: You can choose to show or hide the location of the performer according to the established number line. The number will float above the performer icon and will change as the performer moves on the stage.
Performer Placement Detail: Performer Placement Detail: If you have turned ON the placement number, choose full numbers 1 (1,2,3…), half numbers 0.5 (1.5, 2.0, 2.5…), or quarter numbers 0.25 (1.25, 1.5, 1.75…) to show the amount of detail you want to see on the performers on the charts as they relate to the number line.
Body Direction: Turn ON or OFF the indicator which points to the performer’s ‘front’ where their hips are facing. You can rotate the performer’s direction by selecting the actor and then using the rotation tool. You can also select a group of performers and rotate them all as a group to a new direction.
Show Line Breaks When Lines Overlap: A small white border surrounds the traffic arrows to allow you to indicate which performer gets priority. When lines overlap, the most recently drawn arrow will be placed on top of the others and will show a ‘break’ in the other lines, indicating that they get priority. If you wish to change the priority, just change the layer of the arrow until the desired ‘break’ occurs. See Stacking layers in Charts.
EDITING CHARTS:
Once you've created your stage, scene list, and actor icons, you're ready to begin making your charts. Press 'Done' and get started!
Chart Thumbnails: Chart Thumbnails: On the left side of the screen, you'll see a ‘drawer’, which features the name of the production at the top, and under it you will see the scene list. To begin creating/editing charts for any scene, tap on the scene and thumbnails of any created charts will show up. You can scroll up/down this list of chart thumbnails to begin editing. If you are creating your first chart, you will see a thumbnail that says 'No Charts'. Note: On the iPad, this drawer can be easily hidden by tapping on the "<" button at the top the drawer. To bring it back out, tap again. On the Web, the drawer does not slide out.
Re-Order/Move/Delete Charts:
You can move or delete charts by tapping MOVE/DELETE at the bottom of the thumbnail column. Open the scene you want to edit.
Re-ordering Charts: You can re-order the charts by grabbing the ‘handle’ on the right side of the thumbnail. The chart number will automatically change.
Moving Charts: If you select the circle in the left side of the thumbnail you can choose one or more thumbnails. Once you have selected the chart (s) press MOVE. This will bring up a scene list and you can choose which scene you want to move the selected charts to. Then tap DONE.
Delete Charts: Once you have selected the chart(s) you press DELETE and then DONE.
Lock Mode/Scrolling:
Press the 'lock' icon at the menu bar to lock the project from being edited. In this mode, you can swipe with one finger forward and backward through the entire show without having to worry about inadvertently editing any of the charts. With two fingers you can jump from scene to scene.
View Tool:
Choose to exit charts and view the script/score or the combined charts & script/score to link the charts together.
ADDING CHARTS:
Add a Blank Chart: "+" > "Add Blank Chart"
To begin editing a chart, press the "+" button at the top menu bar. Then, select 'Add Blank Chart'. You will see the chart thumbnail show up on the drawer with the default chart number (i.e. 1.1).
Chart Number: On the actual chart, which fills the entire screen, you will see the chart number in the lower right corner.
Cue Line: Above the chart number is the 'cue line'. Tap in the box to enter the cue line or the name of that particular moment which that chart will represent. For example, it could be a line in quotes ("Where are you going?") or the name of the section (Start of the Grand Waltz). At the center is the logo you have imported into the show. At the lower left corner is the name of the scene (from the scene list you created earlier.
Add “Duplicate Chart”: + > Add Duplicate Chart
Once you've created your first chart and you want to create the next chart, touch the '+' button on the top menu. This time select add 'Duplicate Chart', which will add an exact duplicate of the last chart, except that it will have a unique chart number. Because most things won't move drastically from one chart to the next, this will free you up from re-creating the scenery and re-adding all of the actors, and will save you a lot of time. Continue to drag the actors to their new positions, draw the actor pathways and traffic, enter notes, add text boxes, etc. for the rest of the show. You can create as many charts as you want.
Add “Next Chart”: + > Add Next Chart
Press the ‘+’ button and choose ‘add next chart’. This will create a duplicate chart of everything on the previous chart, except for any text boxes and any drawn lines/arrows. Presumably, the next chart will have performers in new positions and perhaps will require new traffic patter arrows and new details. This function makes it faster for you to document quickly without having to delete arrows or text boxes.
Zoom:
By tapping the 'magnifying glass' icon, you can use the slider, which appears to zoom into or away from the stage. This is ideal for larger stages like football stadium playing spaces. In order to be able to edit the actors, which remain in 'scale' it's recommended to 'zoom in' so you can edit the icons more accurately. Once you have 'zoomed in' you can then drag yourself around the playing space by using TWO FINGERS until you get to the element you want to edit. Then, you can easily zoom out to see the edit. On the Web, hold the ‘control’ key while you drag the mouse around the stage.
Chart Layers:
In order to allow for quick editing, every chart has two layers. 1) Scenic Layer and 2) Performer layer. In order to begin editing, you MUST select one of the layers.
Scenic Layer:
Activate the 'scenic layer' by pressing the 'double layer' icon (looks like two sheets of paper). On this layer you can Draw shapes, lines or add set pieces from the StageWrite catalogue, saved or imported set pieces. You can also insert text boxes.
Performer Layer:
Activate the 'performer layer' by pressing the 'triple layer' icon (looks like three sheets of stacked papers). On this layer you can add shapes, set pieces, notes, text boxes, performer icons.
TIP: Even though you CAN add set pieces to the performer layer, it is recommended to keep the set pieces and actors on separate layers. This will prevent you from inadvertently dragging a set piece as you try to drag an actor to a new position.
Add Set Pieces/Props to the chart:
Tap the SET PIECE icon from the button in the main menu which will show the pre-set and any imported set pieces/props to choose. Any created or imported objects will be at the top of the list.
Add Notes/Text Box to the chart:
Tap the NOTES icon from the main menu to add:
TEXT BOX: A text box appears at center stage. Enter text, resize the text box by grabbing the top right corner of the box so the text can all be seen. Then position the text box in a position on the chart where the text can be seen. You can edit the text by selecting EDIT from the edit bay, and use the font tools to edit the Font Color, Font, Font Size, Bold, Italics, Underline to the selected text.
Then tap ‘done’.
NOTES: You can add details on a semi-transparent layer on a chart and you can choose to show or hide the notes on that layer.
TIP: Notes will NOT be printed in a PDF. If you want text to be printed on the chart, you should use a text box.
Add Performer Icons to the stage:
Tap the PERFORMER icon button in the menu above drawer button which will float the ‘Green Room’ on the page. To add an actor to the stage, tap the performer you want on the stage and the icon will appear center stage. Then, drag the performer into their position on stage. You will notice that the floating performer placement number floats above the icon and automatically adjusts according to the position (stage right or stage left). If you tap ‘Drawer’ the Green Room will appear in a drawer on the right side of the screen for easy access. To slide the drawer out of the screen, tap the PERFORMER ICON.
Un-do/Re-do: The Un-Do button will undo or redo actions on the chart. Once you leave a chart, the chart is saved and the cache is cleared for the undo/redo button.!
CHART LAYERS:
Every chart has three layers. 1) A Permanent Layer. 2) Scenic Layer and 3) Actor layer. In order to begin editing, you MUST select one of the layers.
Permanent Layer: (bottom layer)
The permanent layer appears on every chart. To edit this layer, you go to the 'Stage Dimensions' menu.
Scenic Layer: (middle layer)
Activate the 'scenic layer' by pressing the 'double layer' icon (looks like two sheets of paper). On this layer you can: Draw shapes, lines or add set pieces from the Stage Write catalogue, saved or imported set pieces. You can also insert text boxes.
Performer Layer: (top layer)
Activate the 'Performer layer' by pressing the 'triple layer' icon (looks like three sheets of stacked papers). On this layer you can add shapes, set pieces, notes, text boxes, performer icons.
TIP: Even though you CAN add set pieces to the performer layer, it is recommended to keep the set pieces and actors on separate layers. This will prevent you from inadvertently dragging a set piece as you try to drag an actor to a new position.
DRAWING TOOLS:
Shapes: Square, Circle, Triangle, Arc, etc. By tapping the shape icon, the shape appears center stage. You can re-size the shape by dragging the upper right corner of the icon, or move the entire shape by dragging from the center of the object.
Jointed Lines/Arrows: Add a jointed line or arrow by tapping the jointed line (or arrow) icon. A triple jointed line will appear center stage. The joints are each indicated by a circle around the joint. To add a new joint to the line on the iPad, simply tap-hold anywhere on the stage to add a new point or on the Web, control-click. You can also drag any of the joints to any place on the stage. Once you are happy with the jointed line, tap 'Done' and the line/arrow will be saved as an individual shape. You can rotate it now as an object or re-edit the joints by tapping the 'triple joint' icon at the top menu bar.
Curved Lines/Arrows: Same as jointed lines/arrows.
Freehand Lines/Arrows: Draw a freehand shape or arrow by tapping FREEHAND. Prior to drawing the shape, choose your color and turn ON or OFF the arrowhead. The system will retain whichever arrowhead setting you last used. After you have drawn your shape, hit ‘save’. Hit CLEAR if you want to clear and re-draw. If you draw multiple strokes the entire object will be saved as one object. You can rotate the object with the rotation tool.
TIP: When drawing a directional arrow, make sure you lift your finger while still traveling in the correct direction. If your finger backs up when you lift off the screen, the arrowhead will follow your finger direction.
EDIT BAY:
The Edit Bay can be shown or hidden by tapping the EDIT BAY button on the main menu. When an object is selected, the available options for that object appear in the edit bay, including: Cut, Copy, Paste, Delete, plus:
Group: When more than one object on the same layer is selected those objects can be moved as a group (copy, pasted, rotate, etc.).
Edit: Shapes or text boxes can be edited by pressing ‘edit’.
Clear: This button clears the selection of any objects. It does not delete the item.
Line Color: Pick a color from the color picker for the line (or shape border).
Fill Color: Pick a color from the color picker for the fill of the shape.
Layer Editor: Every object placed on the chart is placed in a layered stack in the order they were placed on the chart, the first is the lowest level. Sometimes items will overlap slightly. In that case you can choose which object should be ‘layered’ on top or below the other object until it appears the way you want it to appear. If you select any one object, the layer number of that object will appear in the edit bay. If you tap on the Layer button, you can choose to send it to the Top, Bottom, or send it Up or Down a layer until it appears the way you want it on the chart.
ROTATION TOOL:
Rotate any object by tapping the 'rotate icon' in the edit bay. You can press any of the rotation keys (0, +1, +10, +90, -90, -10, -1) to rotate the object by the according degrees. To return it to the original, press 0.
LINK TO SCRIPT/SCORE:
To go View Tool and select Charts & Script/Score view to link charts together. For details on how to Link charts to a script, see LINK SCRIPT.
For details on how to link charts to a staging score, see LINK STAGING SCORE.
SYNC/SAVE:
Your charts are automatically saved when you leave a chart. If you are working on a chart for an extended amount of time, tap on the SAVE (web)/ SYNC (iPad) button so your changes are saved, synced to the web system.
TIP: If you are working with a collaborator, make sure you are not making changes to the same chart at the same time, which could create a conflicted version of the production. If there are two different versions of the same chart detected, the system will accept the most recently synced version as the version. In order to avoid any conflicts you should turn off your collaborator’s access to a scene while you’re working on that scene. Also make sure you sync your changes to the web prior to allowing them access, and that they have synced their production before making any additional changes.
PRINTING/CREATING PDFs:
See PRINTING in Production.
SCRIPT:
IMPORTING PDF:
Tap IMPORT SCRIPT icon and select PDF file to import the script into the system. This places the PDF on its own layer in the system. The items you add in the Stage Write system will be saved on a different layer and not the actual PDF so you can easily replace a page without losing your notes.
Replacing Pages: When a line or lyric changes, you can simply replace that page by going to the script view, selecting the page you want to replace, then tap the IMPORT SCRIPT icon from the main menu above. Tap REPLACE CURRENT PAGE, then select the single page PDF to replace that page. This will replace only the PDF. Your notes will not be replaced so you don’t have to re-write your notes.
Inserting Pages: Sometimes additional lines or lyrics will be added and will force the dialogue onto a 2ndpage. In this case you can insert a new page by going to the IMPORT SCRIPT icon from the main menu, go to the page where you want to insert, tap INSERT SCRIPT PAGE, choose ‘before’ or ‘after’ the currently selected page. Then select the new page to insert and simply shift your notes as required.
Delete Page: By tapping the IMPORT SCRIPT icon from the main menu, tap DELETE CURRENT PAGE, confirm.
Navigating through the script:
The arrow keys allow you to navigate through the production, page by page, or all the way to the front (double arrow) or all the way to the end (double arrow).
Go To Command: If you want to jump to a specific page, tap on the ‘Page _ of _’ in the middle of the arrows. This will open a dialogue box where you can enter the page number you want. Hit ‘GO’ and it will jump you to that page.
Adding Notes/Cues to Script:
Create your calling script or blocking book/show bible by adding notes and cues to your script.
Adding Light Cues: Script View > LQ
With LQ (light cue) button selected (in red), draw a box around the anchor cue in the script by clicking and dragging. A box will appear around that word or cue in the script. Choose whether you want the LQ to go to the right side or left side of the page. Once you choose, a 2ndbox will appear with ‘LQ’ on that side of the page. Just type the cue number in the box and place the box in the available white space on the page.
Editing Light Cue:
Select the Cue: To edit the already created cue, tap on the cue number, not the anchor to enable editing.
Add Additional Lines: If you want to add another cue to the same anchor, just hit RETURN key and you can type on another line.
Re-size cue box: If you want to adjust the size of the box, grab the lower right corner of the box to resize.
Moving cue box: If you want to move the box to a different location, grab it with the repositioning tool at the top left corner of the box.
Delete Cue box: Tap the ‘X’ at the top right corner to delete the cue.
Add Action:
Select the action icon (in red) on the script view. Draw a box around the anchor cue in the script. Choose if you want the action to go to the left or the right side of the page and type the action, resize the box to fit in the white space available on the script. Resizing action box is the same as with light cues.
Add Text Box
Select the text box icon from the main menu in script view, draw a box in the white space where you want to place the text box. Type the information inside the text box, resize the box until it looks the way you want it to appear on the page.
Highlight Lines
Select the 'highlight’ icon from the main menu in script view, and then draw a box around the text you wish to highlight. If you wish to change the color of the highlight tap on the paint icon at the top center of the highlighted section. Once you change colors that color will be active until you choose a different color.
Show/Hide Cues and Notes:
Tap the VIEW icon to SHOW or HIDE all the cues in the script. This is useful if you want to print a clean copy for someone without showing all the notes and details that apply to you.
LINKING CHARTS: Charts & Script
Charts can be linked to a section of the script page by going to the Charts and Script View. On the left side are the chart thumbnails from the production. On the right side is the script. To link a chart to a script, just select the portion of the page on the script by clicking on the script and dragging down until you have selected the portion of the page that applies to that chart. Then, drag the chart thumbnail into the section of the script. When a chart has been linked to the script, a gray box will show which chart number is linked. You can adjust the size, location, or even delete the link by using the tools on the corners of the box.
TIP: The grey boxes will not appear in the other views of the production, nor when the script is printed as it would likely interfere with light cues and notes already placed in the white space. However, the charts will be printed on the back of the page when a combined charts/script PDF is created.
PRINTING:
See PRINTING in PRODUCTION for details.
STAGING SCORE:
Whiting Method:
The Whiting Method is a patented method for documenting staging and choreography, aligning the actions of performers, props and scenery with the timeline of action in a play or with counts of music in a musical presentation. This method allows the user to document exactly what each person or element is doing at every moment during the production, called collectively The Staging Score.
Voice Rows: Two rows in the table represent the audio portion of the performance. The top row is to place the name of the speaker. The 2ndrow contains the dialogue heard in time. In a musical presentation, the lyrics are lined up with the counts in the music.
Count Row: Under the voice row is the row for musical counts, for musical presentations that correspond with the voice row.
Performer Detail Rows: Each performer has three rows in which to detail what the performer is doing at every moment in time during the production.
Step Row: The name of the step is listed, ideally in universally accepted terms (ballet, tap, etc.) and the name, or syllable of the step corresponds to the actual count in the music.
Feet Row: The active foot is detailed for the corresponding step.
RIGHT: R (right), RF (right-front), RS (right-side), RB (right-back), RXF (right cross in front), RXB (right cross behind).
LEFT: L (left), LF (left-front), LS (left-side), LB (left-back), LXF (left cross front), LXB (left cross behind).
Detail Row: Any additional details about the movement, or props, or intention, or spacing is detailed in this section, aligned with the counts that correspond.
ADD STAGING SCORE:
In SCORE VIEW, tap ‘+’ and select which type of score you will enter from previously entered templates that exist for that production. Select which performers you want to detail in this moment and tap DONE. This will add a blank staff next in the list of thumbnail list for you to edit.
DIALOGUE STAFF:
In a dialogue staff where there is no music, there are 32 divisions of time which signify time passing. The dialogue is placed in the voice row and the detail about the performers is entered underneath the dialogue or time passing.
MUSICAL STAFF:
In a musical staff with music, the count row appears across the page to be read similar to how music is read. The counts are divided into sub-beats to allow the detail of specific movement on each count or sub-count for each performer. There are three templates to choose from, including:
8 Count Staff: 8 counts fill the page, sub-divided into four sub-beats as they are in music. 1, e, &, a, 2, e, &, a… Counts can be added or subtracted to match an irregular rhythm.
10 Count Staff: 10 counts fill the page, sub-divided into four beats each as they are in music.
Triplet Staff: 8 counts across the page, sub-divided into three beats as they are in music, 1, &, a, 2, & a, 3, &, a….
Customize Staff: Settings > Staff Templates > Add:
You can create your own custom templates for your production that is more suited for your production.
Template Name: This is the name of your new template which will show up on the list.
Display Name: This name will show up on each score. Leave empty if you want it to be the same.
Prefix Count: If there are musical counts, turning this ON will show the number of counts on that staff. (ie. 8 Count or 7 Count)
Counts and Columns:
Default Counts: Choose the number of counts you want in your staff template. For musical productions, choose something between 1 – 12 counts. For non-musical productions, choose one.
Allow to Add/Delete Counts: Turn ON or OFF the ability to add/delete counts within production without changing the template.
Columns per count: For music productions, choose the number of sub-divisions per count. Normally this is four, but in a triplet this is 3, sometimes 6. For non-musical productions, choose 32. This will give plenty of options to enter data along the timeline.
Count Column Headers: In the Count Row, this is the label that will appear at the top of each division of the counts. For Musicals, say YES.
Count Index Column: Use the + or – symbol to move the COUNT NUMBER into the desired sub-division of the count. Normally this will go into column 1 (the downbeat) . You will see the “(n)” appear in that column. This means in that column the number of that count will appear in that column of the count. (ie. 1 & a, 2 & a). If you placed it in the 2ndcolumn it could go ( a 1 &, a 2 &,…).
ROWS:
Voice Rows: If several people, or groups sing or overlap you can add an additional voice so you can detail each of them separately. Rows appear in pairs.
Number of Detail Rows: The Default from the Whiting System is 3 (Step, Feet, Details) but you can add additional rows to detail more or less. For example, you could add another row and label ‘Arms’ or ‘Focus’ depending on your needs in the detail row labels. When you are happy with your settings, press SAVE.
EDIT STAFF:
Score Thumbnails: The thumbnails of the staging score are found within each scene.
Lock Mode: In lock mode you can swipe through each staff to review.
View Tool: Switch to view charts, or charts and score.
Add Staff:
Press the “+” button and choose which type of staff you want to add next in the scene.
Choose Staff Type: Choose from the templates which type of staff you want to add.
Choose performers: Choose which performers from the production you want to include in this staff.
ENTERING DATA:
Edit detail: To edit the data that goes into the table on the Web: tap on any division of the table. A red box will appear. Once the red box is in the position where you want to insert the information, tap ‘EDIT’, type ‘e’ (for edit), or hit RETURN. This will allow you to type into that division of the table the information you want to enter. Type the information into the row. When you are done typing hit RETURN again and it will save the information.
Format Data: Once you have entered the data into the row, you can:
Edit: Tapping EDIT will allow you to select the text and format the font size, color, bold, italics, or underline as you want.
TIP: On the Web, press SHIFT+ arrow keys to select character by character.
Command Arrow jumps to the end or front.
Option Arrow jumps from word to word.
On iPad, use selection keys for word by word.
Resize: You should resize the action so it aligns with the timeline and dialogue above. Tap RESIZE and drag the blue dots to the division area that corresponds to the appropriate dialogue. For example, if the description of Juliet picking up a prop is a lot of words, but the action itself is quick, make sure the words all align within the allotted time.
Clear: This deletes the contents of the selected area.
Cut: This deletes the contents of the selection but places it on a clipboard.
Copy: This copies the contents of the selection onto a clipboard.
Paste: The pastes the contents from the clipboard.
Done: Tap DONE when you are done editing.
EDITING STAFF:
Add voice: You can add another voice by tapping the + button next to voice on upper left of staff.
Delete Voice Row: Tap the ‘X’ next to voice and then tap the Red ‘X’ at the right side of the row. Then tap the Check mark when you are done.
Re-Order Voice Row: Tax the ‘X’ next to voice and then tap the blue arrows to reorganize the voices. Tap the check mark when you are done.
Additional performer: You can add an additional performer by tapping the + next to the character on bottom left corner of staff. Then, choose from the list of existing performers in the production.
Delete Performer: Tap the ‘X’ next to character in the bottom left corner of staff, then tap the RED ‘X’ to confirm. Then tap the check park when you are done.
Re-Order Performers: Tap the ‘X’ next to character in the bottom left corner of staff, then tap the blue arrows to reorganize. When you are done, tap the check mark.
Re-Order/Copy/Move/Delete Staff:
By pressing the COPY/MOVE/DELETE button under the thumbnails of the score, you can:
Re-order the staff within the scene by grabbing the ‘handle’ on the right side of the thumbnail.
Copy the Staff by selecting the staff (circle turns red), then press COPY and choose which scene you want to copy it into.
Move the Staff: use the same steps as for Copy but press MOVE and select the appropriate scene.
Delete the Staff: use the same steps to select the staff and tap DELETE and then DONE.
FILTER:
You can choose to filter out the information and show only the information pertaining to one or a few performers, allowing you to find the information more easily. This is helpful when putting in a new person into a production. Go to FILTER icon, choose the performer (s) and tap APPLY. This will filter out all the other information in the score.
ZOOM:
The zoom function will allow the staff to fit either the original size or auto-fit to the size of your screen for easier viewing.
SAVE/SYNC:
Data is saved each time you leave a staff so if you are working on a staff for a long period of time, it’s a good idea to hit SAVE frequently so your changes are not lost. On the iPad, make sure you SYNC often to upload the data to the web system.
LINK TO CHARTS:
In Charts & Score view you can link charts with staffs from the score. The left side shows the thumbnail images of the charts in the production and the right side shows the staffs/score for the production. Simply drag the chart that corresponds to the staff to link them together. When printed, the charts that are linked to the staff will print on the left side (back) of the page. NOTE: if there are charts that don’t link to any chart, that chart will not be printed in a hard copy.
PRINT:
See PRINTING in PRODUCTIONS.
SYNC:
Working Online:
While you are working within an internet signal, it’s best to work in ONLINE mode by tapping the cloud icon at the top left corner of the iPad app. This will ensure that your changes will be synced to the web system.
Working Offline:
If you are working in an area that has no internet signal, select to WORK OFFLINE. It’s best to be sure to be synced to the system just before you go offline and then as soon as you return to a signal to switch to work online so the changes can be sent to the web system.
The web system becomes the master document so it’s important that changes get synced to the web as quickly as possible to avoid any conflicting productions.


Import Set Design Icon

Shape Tool Icon
